Creating Raster Tiles
Steps
- Clip and project the raster
- Cut the raster into png XYZ image tiles
- Convert the png images to webp
- Directly copy the files to the server via USB
Clipping the Original Raster
Using QGIS (Preferred Method)
- Create a new QGIS Project
- Change the projection to WGS84 (or WebMercator, not sure if it makes a difference)
- Load the Raster into QGIS
- Choose the appropriate transformation
- Check the accuracy of the transformation with the Hydrant layer or other data collected with the GPS
- If the points are off by 3’, the transformation is likely wrong
- Resize the canvas to the desired size
- Set any custom display settings for the raster such as Min/Max, bilinear resampling, etc.
- Right click on the raster and choose Save As
- Choose to use the rendered image and not the raw image if making display adjustments, otherwise ignore
- Choose to use the map canvas as the extent
- Choose WGS84 as the output projection (this will apply the transformation applied above)
- Choose NO Compression
- Change the Settings to COMPRESS - Packbits
- Change the Settings - BIGTIFF - YES
Using ArcGIS Pro
The last time I tried this with a whole county ortho ArcPRO crashed.
Also, ArcPRO and ArcMap did not have a transformation for the 2020 county ortho.
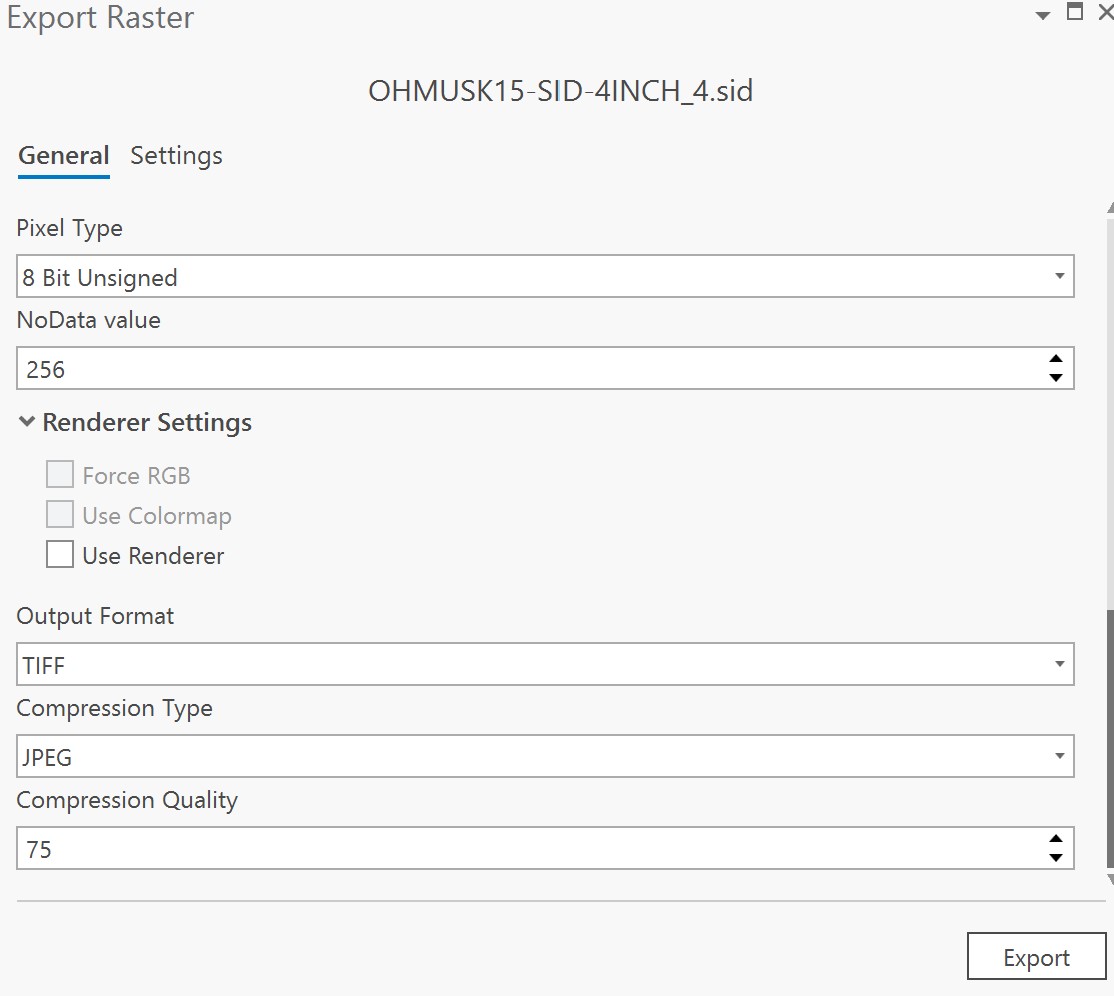
- Georeference (if needed) and Export the raster using the Web Mercator 3857 Projection (or WGS84, not sure if it matters) (256 for No DATA) in ArcPro using ITRF00 transformation.
- QGIS is missing the ITRF00 transformation. It is hardcoded into PostGIS so the vector data transforms correctly, but I am not using PostGIS for rasters.
- See the settings below for the export. Optionally turn off pyramid generation (under settings) to speed up processing, espcially for large rasters.
- For larger rasters such as whole county orthos this process will take some time.
- For larger rasters such as whole county orthos this process will take some time.
Using the Command-Line & GDAL
Two images will be created, one in the original projection Ohio SP South - EPSG:3735 with a JPEG quality of 75. This one is for desktop GIS use. The second image will be in Web Mercator EPSG:3857, with a JPEG quality between 50 and 60, which will be used to create the image tile cache for web applications. This may not matter if using JPEG for the final output raster tiles.
Saving using LZW or DEFLATE resulted in a very large tif. Using -co compression=JPEG -co JPEG_QUALITY=75 results in great image quality in a much smaller file. Settings used:
-multi 			// Uses two processes to manipulate the images
-wo			// DOES NOT SEEM TO BE WORKING Total number of CPUs for calculations
-cutline		// Shapefile to clip the polygon referenced with the full file path in quotes
-crop_to_cutline	// Clip the raster using the cutline polygon
-co			// Compression used and options
-dstalpha		// Use an Alpha layer to store transparency - the original channel is used if none is provided elsewhere
gdalwarp -multi -wo NUM_THREADS=8 -of GTiff -cutline E:\ortho18\clip-coz.shp -crop_to_cutline -dstalpha -co COMPRESS=JPEG -co JPEG_QUALITY=75 "E:/ortho18/Area Wide Mosaics/OHMUSK18-SID-3INCH/OHMUSK18-SID-3INCH.sid" E:/ortho18/qgis-testing/OHMUSK18_3IN_GDALWARP_CLIP_JPG75_ALPHA.tif
gdalwarp -wo NUM_THREADS=ALL_CPUS -multi -of GTiff -cutline E:\ortho18\clip-coz.shp -crop_to_cutline -dstalpha -co COMPRESS=JPEG -co JPEG_QUALITY=75 -co TILED=yes -co BIGTIFF=YES "E:/ortho18/Area Wide Mosaics/OHMUSK18-SID-3INCH/OHMUSK18-SID-3INCH.sid" E:/ortho18/qgis-testing/OHMUSK18_3IN_GDALWARP_CLIP_JPG75_ALPHA_BIGTIFF.tif
If an error comes up about the size being too large try adding these settings -
-co TILED=yes -co BLOCKXSIZE=256 -co BLOCKYSIZE=256 - started task at 11:30 on march 26th
Mapbox GeoTIFF Upload Recommendataions
While this documentation states using 256x256, Mapbox raster tiles actually use 512x512.
TIFF uploads
There are a couple requirements for TIFFs:
Only 8-bit GeoTIFFs are supported. Run gdalinfo to find your GeoTIFF’s resolution. Mapbox only accepts TIFFs with georeferencing information (GeoTIFFs). Make sure your TIFF is georeferenced before trying to upload. If you are attempting to upload large TIFFs (multi GBs), here are some ways you can optimize your TIFF before uploading:
- Reproject to Web Mercator EPSG:3857.
- Set blocksize to 256x256.
- If compression is needed, use LZW.
- Remove Alpha band, if applicable.
- 10GB Limit
Cutting the Raster Tiles
Using QGIS & Generate XYZ Tiles (Easy & Slow Method)
- Load the raster into QGIS
- Change the zoomed in sampling to Average and any other settings under properties
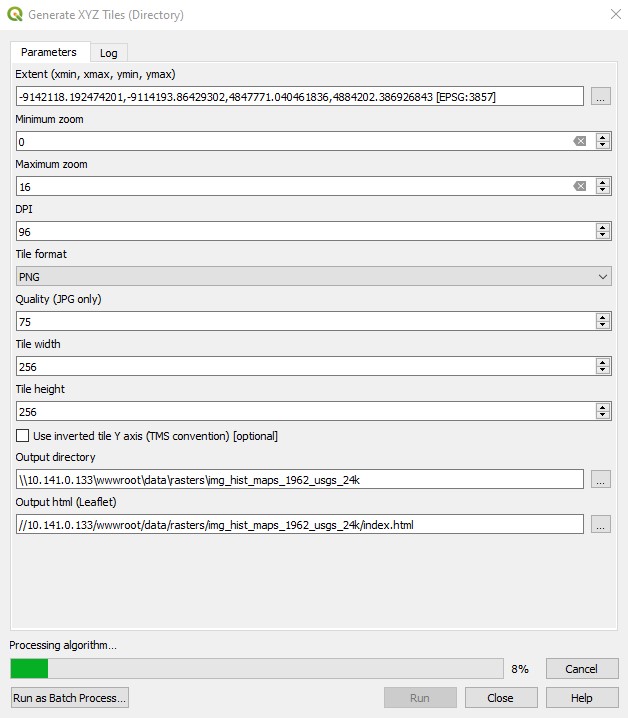
- Export to raster tiles using the tool Generate XYZ Tiles
- See the screenshot with settings - all defaut except make sure to use the extent of the raster layer
- Use png for the format, this allows for the transparency on the edges of the raster to be maintined, but this does come at a cost of larger file size when compared to jpg
- Use maxzoom 16 for old paper maps, 20 for satellite imagery. Again this export will take some time, run it overnight or over the weekend.
- Each additional zoom inceases the total tiles by
previous zoom number of tiles ^ 2
- Each additional zoom inceases the total tiles by
- Copy the tiles folder to the current server static data directory, renaiming the folder to match the schema of the other folders. Currently this directory is:
\\ip of server\iis_gis_virtual_directory\data\raster-tiles
- Convert the directory of png image tiles to webp tiles using the Node script under GIS_Tools\Creating Raster Tiles
- ``
Mapbox recommends creating high resolution tiles using tile width and height 512.
Using gdal2tiles (Fastest Method)
- GDAL needs to be installed, this can be done using the Express Install of the OSGeo4W installer.
- Copy the gdal2tiles_latest.py script from Z:/scans/GIS_Tools/Creating Raster Tiles to C:\OSGeo4W64\apps\Python37 or the Python directory of the OSGeo install
- Open the OSGeo Shell from the OSGeo4W Install (not the one with QGIS local install)
- Follow the rest of the commands below.
- Optionally reproject the original image to EPSG:3857 using gdalwarp (see above).
- I used an image projected to WGS84 and this worked out fine, not sure you need to project to 3857
Use the latest gdal2tiles.py python script downloaded from the gdal GitHub site to cut the tif into a folder of high resolution raster tiles for use in web mapping. There are similar scripts that will output to mbtiles or geopackage, or write to JPG files. This script was originally written by the developer of MapTiler. The default for this updated script is to use all the availabel cpu cores, so be careful when running it. Set the --processes to something you can live with, such as half the available cores. A maximum zoom limit of 20 seems to be a good limit, which is about street level, however if you want to use them in AGOL you will need to go to zoom 21 as AGOL does not overzoom tiles.
For the entire bounds of Zanesville cutting a set of tiles takes around 12-24 hours.
python gdal2tiles_latest.py -e -z 0-21 -v --xyz -w leaflet --tilesize=512 --processes=16 C:\Rasters\2020\test_ortho.tif C:\Rasters\2020\test_ortho
OR for regular 256 tiles
python gdal2tiles_latest.py -e -z 0-21 -v --xyz -w leaflet --processes=16 C:\Rasters\2020\test_ortho.tif C:\Rasters\2020\test_ortho_256
The latest version of the gdal2tiles script does not add the tms: false in the leaflet sample map when using the --xyz flag. I have updated this in the script in the GIS_Tools directory, but if you update this script keep an eye our for this error. The xyz convention is the default tile format for Leaflet, Mapbox and ArcGIS Online maps.
Using gdal_gdaladdo
Use gdal_translate to generate the mbtiles file
gdal_translate -of mbtiles mymap.tif mymap.mbtiles
Use gdal_gdaladdo to generate the rest of the tiles (overview tiles)
gdaladdo -r nearest mymap.mbtiles 2 4 8 16
- this results in tiles from z levels??
Unpack the mbiles to folders using mbutil which is a python script, run it using cmd.exe in its own folder like this:
python mb-util
References
https://www.gdal.org/frmt_gtiff.html
https://www.gdal.org/gdalwarp.html
https://github.com/dwtkns/gdal-cheat-sheet
https://www.azavea.com/blog/2018/10/11/creating-leaflet-tiles-from-open-data/
http://www.thesjg.com/2013/03/generating-aerial-tiles-from-naip-imagery/
https://gis.stackexchange.com/questions/104453/why-result-of-merge-of-multiple-raster-is-so-big
http://docs.geonode.org/en/master/tutorials/advanced/adv_data_mgmt/adv_raster/processing.html
https://alastaira.wordpress.com/2011/07/11/maptiler-gdal2tiles-and-raster-resampling/
https://github.com/pramsey/gdal2tilesp
https://pvanb.wordpress.com/2017/03/06/raster2mbtiles/